
Hi everyone! I’m Salena from @salenasbujo and @letteredinblush, and I’m here to share a super fun book tracker tutorial with you. I love using my bullet journal to track lists of all kinds, and this spread is the perfect way to keep track of books you want to read or have finished reading.
Gather Your Materials
- A bullet journal or notebook of your choice
- STEEL M-301 Mechanical Pencil
- Zensations Technical Drawing Pen
- Zensations Brush Pen in Super Fine
- Mildliner Brush Pen
- Ruler
- Eraser
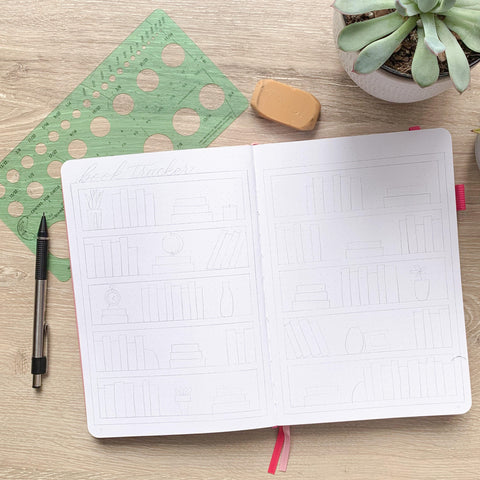
Step 1: Create a Pencil Sketch
Using a STEEL M-301 Mechanical Pencil, sketch out the general layout of your book tracker. I always start with pencil when creating a spread like this because I can measure everything out and make changes along the way. I wanted to create a bookshelf to house the books I want to read, so I measured out the shelves using the dot grid in my journal. Each shelf is 6 grid spaces tall, with the shelves being 1 space thick.
Once you have the shelf sketched out, start adding books and decor in various arrangements around the shelves. I decided to scatter 100 books all over the shelves to give myself plenty of space for books I want to read throughout the year. This is perfect for anyone with an ambitious reading goal!
Step 2: Add A Title and Some Color
Next, add a book tracker title using the Zensations Brush Pen in Super Fine. This brush pen tip is tiny and perfect for modern calligraphy when you don’t have a lot of space to work with. I love it for small titles or label writing.
Choose several of your favorite Mildliner Brush Pen shades to add color to your spread. I decided to save my favorite gray Mildliner Brush Pen to color in books as I read them later on, so I chose to use a lot of color to decorate the other items on the shelves. I used my own bookshelves for inspiration and added a few plant doodles, vases, or bookends in the empty spaces around the books. I love that the Mildliner Brush Pen comes in a variety of mild colors to suit your style. Brown is the perfect color for the shelf, and I used some of my favorites, like Smoke Blue and Violet, to color in the rest of the decor pieces.
The Mildliner Brush Pen sets are the perfect addition to your stationery bag. These pens are double ended, so you can fill in color with the flexible brush tip and use the bullet tip for finer details. On larger spreads, the brush tip is also great for modern calligraphy.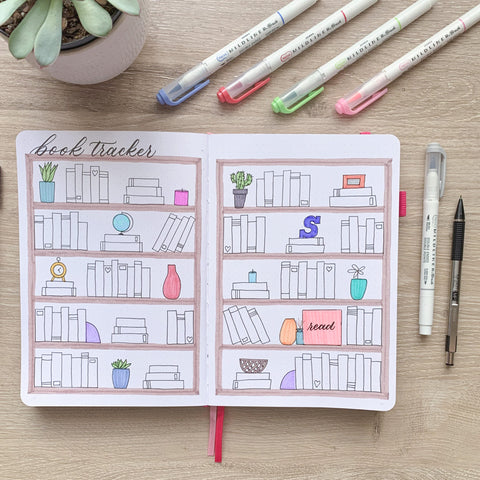
Step 3: Add Outlines
Next, grab a few varieties of the Zensations Technical Drawing Pen to outline the doodles and books in your spread. I love that this technical pen comes in different point sizes for various steps in your project. I chose the 0.3mm tip for outlining the books and items on my bookshelf. It was the perfect medium size for keeping the lines neat and consistent. Adding a few extra line details or hearts to some of your books is a great way to give them a bit of character if you feel like the spread needs a little something. 
Next, look at your spread as a whole and make sure you have filled in any empty spaces. Add any books or decor pieces to help the spread come together. 
Step 4: Add Book Titles
Next, add titles to the books to represent any titles you would like to read. The 0.1mm Zensations Technical Drawing Pen is the perfect size for adding names inside of the small books. I love the look of scattering these book titles all over the shelves. I tend to choose books to write in based on the length of each title and where I think it would fit best. I leave some of the books empty so I have space to add more titles as I come across them in the future. 
Step 5: Color in Books
Finally, use the Mildliner Brush Pen in Gray to color in the books once you’ve read them. I love the mild ink of these pens, which is great for highlighting over black ink without smudging. I use the flexible brush tip to color each book spine once I’m finished reading them.
You’re Finished!
I hope I have inspired you to try a spread like this in your own journal! Bullet journals are a great way to keep track of all kinds of lists and trackers, so I hope this one helps you in tracking your own reading goals.
For more bullet journaling tutorials, check out How to Create a Cleaning Schedule in a Bullet Journal or visit the Bullet Journaling category on the Zebra Pen Blog for even more tutorials.